I have put together a user-friendly Git tutorial that is really easy to follow, explaining what Git is in a very simple way. As you move through the guide, GitHub is covered right alongside Git so you can see how the two work together.
Interested to learn Python? Watch here.
1. Why Git & GitHub?
Git is a free and robust tool for tracking changes, saving work, and working together on projects of any size because it really helps manage everything from a single file to a huge software repository, allowing mistakes to be fixed by going back to earlier versions.
Small changes or massive ones are both supported by Git. Built-in safety nets are appreciated when trying to undo a change that was made by accident or someone in the team forgot what they were working on.
2. Installing Git & VS Code
Git: Download and install from git-scm.com.
Either the terminal on Mac or Linux, or even Git Bash on Windows, can be used so you can run git –version to check if it’s working as it should. Then move to the next step. Sometimes people forget this part, but it’s really simple: just type the command and hit enter. The version will display at the end. A versatile and free editor is Visual Studio Code (VS Code).
3. Configuring Git
Set your identity so commits are associated with you:
git config --global user.name "Your Name"
git config --global user.email "[email protected]"
–global applies these settings across all your projects.
Use git config –list to view current config values.
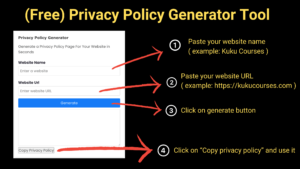
Ultimate Course Membership!
💡 Unlock all courses for premium learning & growth.
✅ Access a vast library of high-quality courses with expert support and seamless performance.
🔗 Learn More & Get Started →4. First Project—Opening in VS Code
Open VS Code.
So you’ve started a new project and now you’re looking at your folder, wondering what next step you should take, right? So let’s get to it!
5. Git Basics: Clone, Status, and Init
Clone a repo:
git clone <repo-HTTPS-url>
Navigate folders with cd <folder>.
Let’s start by checking your files, which can be quickly done by running the ls command in the terminal. If you need to spot hidden files, remember to use the appropriate option.
Check status:
git status
Shows changes, untracked files, staged files, etc.
6. Staging & Committing Changes
Two-step process:
Stage files:
git add <filename>
or stage all with:
git add .
Commit changes with a message:
git commit -m "Describe your changes"
7. Pushing to GitHub
Once committed locally:
Link to a remote repo (if not cloned):
git remote add origin <remote-URL>
Push changes:
git push origin main
main is the default branch naming.
After setup, git push without arguments will also work.
8. Working with Branches & Merging
Branching: Creating a separate copy of your project to work on new features or fixes without affecting the main project.
Merging: Combining your separate copy (branch) back into the main project, bringing all your changes together.
Check Current Branch
git branch
(to check branch)
Rename Branch
git branch -M main
(to rename branch)
Switch to Another Branch
git checkout <branch name>
(to navigate)
Create a New Branch and Switch
git checkout -b <new branch name>
(to create new branch)
Delete a Branch
git branch -d <branch name>
(to delete branch)
9. Pull Requests & Collaboration
On GitHub, open a Pull Request (PR) to merge branches.
PRs allow code review and manage conflicts before merging.
After merging remote changes elsewhere, bring them locally with:
git pull origin main
10. Resolving Conflicts
Conflicts occur when overlapping changes exist.
Resolve by manually editing files, removing conflict markers, then:
git add <file>
git commit
11. Undoing Changes: Reset & Revert
Unstage changes (but keep edits):
git reset HEAD~1
Hard reset to discard changes entirely:
git reset --hard <commit-hash>
View commit history:
git log
12. Forking & Open Source Contributions
Your independent copyright is in your account, and when you do that, the project is now yours to work with however much you want or need to. Then, after making your adjustments and updates, a pull request, also known as a PR, should be opened by you.
TL;DR: Essential Git Workflow
Initialize/Clone a repo
Create/modify files
git add . → git commit -m “msg”
git push to upload changes
Use branches, PRs, merges, pulls, resets as needed
Is this Git Tutorial guide enough for beginners?
Of course! This git tutorial guide walks you thru each significant Gitter step. It’s easy to follow along so you don’t need to worry about missing anything if you just do what’s shown, one step at a time.